在這個深度學習的實現中,我們的目標是預測某家銀行的客戶流失或客戶流失數據-哪些客戶可能離開此銀行服務。使用的數據集相對較小,包含10000行14列。我們正在使用Anaconda發行版,以及Theano、TensorFlow和Keras等框架。路緣石建在Tensorflow和Theano的頂部,Tensorflow和Theano作爲路緣石的後端。
# Artificial Neural Network
# Installing Theano
pip install --upgrade theano

# Installing Tensorflow
pip install –upgrade tensorflow

# Installing Keras
pip install --upgrade keras
Step 1: Data preprocessing
In[]:

# Importing the libraries
   import numpy as np
   import matplotlib.pyplot as plt
   import pandas as pd

# Importing the database
   dataset = pd.read_csv('Churn_Modelling.csv')
Step 2
我們創建數據集特徵和目標變量的矩陣,即列14,標記爲「Exited」。
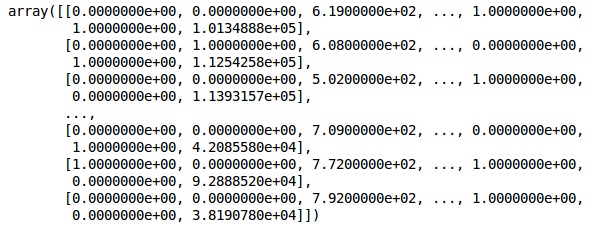
數據的初始外觀如下所示;
In[]:
X = dataset.iloc[:, 3:13].values
Y = dataset.iloc[:, 13].values
X
Output

Step 3
Y
Output
array([1, 0, 1, ..., 1, 1, 0], dtype = int64)
Step 4
我們通過對字符串變量進行編碼使分析更簡單。我們使用ScikitLearn函數「LabelEncoder」自動對列中的不同標籤進行編碼,其值介於0到n_classes-1之間。
from sklearn.preprocessing import LabelEncoder, OneHotEncoder
labelencoder_X_1 = LabelEncoder()
X[:,1] = labelencoder_X_1.fit_transform(X[:,1])
labelencoder_X_2 = LabelEncoder()
X[:, 2] = labelencoder_X_2.fit_transform(X[:, 2])
X
Output

在上述輸出中,國家名稱替換爲0、1和2;男性和女性替換爲0和1。
Step 5
標記編碼數據
我們使用相同的ScikitLearn庫和另一個名爲onehotecoder的函數來傳遞創建虛擬變量的列號。
onehotencoder = OneHotEncoder(categorical features = [1])
X = onehotencoder.fit_transform(X).toarray()
X = X[:, 1:]
X
現在,前兩列代表國家,第四列代表性別。
Output

我們總是將數據分爲訓練和測試兩部分,對訓練數據進行模型訓練,然後對測試數據進行模型精度檢驗,這有助於評估模型的效率。
Step 6
我們使用ScikitLearn的train_test_split函數將數據分成訓練集和測試集。我們把列車與測試的比例保持在80:20。
#Splitting the dataset into the Training set and the Test Set
from sklearn.model_selection import train_test_split
X_train, X_test, y_train, y_test = train_test_split(X, y, test_size = 0.2)
有些變量的值以千爲單位,而有些變量的值以十或一爲單位。我們對數據進行縮放,使其更具代表性。
Step 7
在這段代碼中,我們使用StandardScaler函數擬合和轉換訓練數據。我們將縮放標準化,以便使用相同的擬合方法轉換/縮放測試數據。
# Feature Scaling
fromsklearn.preprocessing import StandardScaler
sc = StandardScaler()
X_train = sc.fit_transform(X_train)
X_test = sc.transform(X_test)
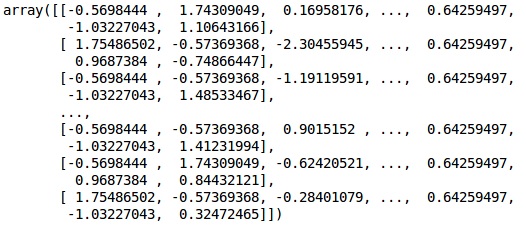
Output

The data is now scaled properly. Finally, we are done with our data pre-processing. Now,we will start with our model.
Step 8
We import the required Modules here. We need the Sequential module for initializing the neural network and the dense module to add the hidden layers.
# Importing the Keras libraries and packages
import keras
from keras.models import Sequential
from keras.layers import Dense
Step 9
We will name the model as Classifier as our aim is to classify customer churn. Then we use the Sequential module for initialization.
#Initializing Neural Network
classifier = Sequential()
Step 10
我們使用密集函數逐個添加隱藏層。在下面的代碼中,我們將看到許多參數。
我們的第一個參數是輸出。這是我們添加到該層的節點數。init是隨機梯度下降的初始化。在神經網絡中,我們給每個節點分配權重。在初始化時,權值應該接近於零,我們使用均勻函數隨機初始化權值。因爲模型不知道輸入變量的數目,所以只需要第一層輸入參數。這裡輸入變量的總數是11。在第二層,模型自動從第一個隱藏層知道輸入變量的數量。
執行以下代碼行以添加輸入層和第一個隱藏層−
classifier.add(Dense(units = 6, kernel_initializer = 'uniform',
activation = 'relu', input_dim = 11))
執行以下代碼行以添加第二個隱藏層−
classifier.add(Dense(units = 6, kernel_initializer = 'uniform',
activation = 'relu'))
執行以下代碼行以添加輸出層−
classifier.add(Dense(units = 1, kernel_initializer = 'uniform',
activation = 'sigmoid'))
Step 11
編制人工神經網絡
到目前爲止,我們已經在分類器中添加了多個層。我們現在將使用compile方法編譯它們。在最終編譯控制中添加的參數完成了神經網絡。因此,在這一步中我們需要小心。
以下是對論點的簡要解釋。
第一個參數是優化器。這種算法稱爲隨機梯度下降(SGD)。在這裡,我們使用幾種類型中的一種,稱爲「Adam優化器」。SGD取決於損耗,所以我們的第二個參數是損耗。如果因變量是二進位的,我們使用對數損失函數稱爲「二進位交叉熵」,如果因變量在輸出中有兩個以上的類別,則使用「分類交叉熵」。我們希望基於精度提高神經網絡的性能,所以我們添加了度量值作爲精度。
# Compiling Neural Network
classifier.compile(optimizer = 'adam', loss = 'binary_crossentropy', metrics = ['accuracy'])
Step 12
在此步驟中需要執行許多代碼。
Fitting the ANN to the Training Set
我們現在根據訓練數據訓練我們的模型。我們使用擬合方法來擬合我們的模型。爲了提高模型的效率,我們還對權重進行了優化。爲此,我們必須更新權重。Batch size是更新權重後的觀察數。Epoch是疊代的總數。採用試錯法選擇批量大小和曆元值。
classifier.fit(X_train, y_train, batch_size = 10, epochs = 50)
Making predictions and evaluating the model
# Predicting the Test set results
y_pred = classifier.predict(X_test)
y_pred = (y_pred > 0.5)
Predicting a single new observation
# Predicting a single new observation
"""Our goal is to predict if the customer with the following data will leave the bank:
Geography: Spain
Credit Score: 500
Gender: Female
Age: 40
Tenure: 3
Balance: 50000
Number of Products: 2
Has Credit Card: Yes
Is Active Member: Yes
Step 13
預測測試集結果
預測結果會給你客戶離開公司的可能性。我們將把這個機率轉換成二進位0和1。
# Predicting the Test set results
y_pred = classifier.predict(X_test)
y_pred = (y_pred > 0.5)
new_prediction = classifier.predict(sc.transform
(np.array([[0.0, 0, 500, 1, 40, 3, 50000, 2, 1, 1, 40000]])))
new_prediction = (new_prediction > 0.5)
Step 14
This is the last step where we evaluate our model performance. We already have original results and thus we can build confusion matrix to check the accuracy of our model.
Making the Confusion Matrix
from sklearn.metrics import confusion_matrix
cm = confusion_matrix(y_test, y_pred)
print (cm)
Output
loss: 0.3384 acc: 0.8605
[ [1541 54]
[230 175] ]
From the confusion matrix, the Accuracy of our model can be calculated as −
Accuracy = 1541+175/2000=0.858
我們達到了85.8%的準確度,這是很好的。
The Forward Propagation Algorithm
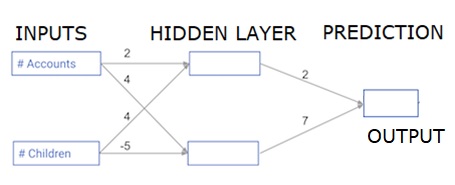
在本節中,我們將學習如何編寫代碼來爲一個簡單的神經網絡進行正向傳播(預測)&負;

每個數據點都是客戶。第一個輸入是他們有多少帳戶,第二個輸入是他們有多少孩子。該模型將預測用戶在下一年進行多少交易。
輸入數據作爲輸入數據預加載,權重在稱爲權重的字典中。隱藏層中第一個節點的權重數組分別爲權重['node_0'],隱藏層中第二個節點的權重數組分別爲權重['node_1']。
輸入到輸出節點的權重以權重形式提供。
The Rectified Linear Activation Function
「激活功能」是在每個節點工作的功能。它將節點的輸入轉換爲一些輸出。
校正線性激活函數(稱爲ReLU)廣泛應用於高性能網絡。此函數將單個數字作爲輸入,如果輸入爲負,則返回0;如果輸入爲正,則輸入爲輸出。
下面是一些例子;
- relu(4) = 4
- relu(-2) = 0
我們填寫relu()函數的定義−
- We use the max() function to calculate the value for the output of relu().
- We apply the relu() function to node_0_input to calculate node_0_output.
- We apply the relu() function to node_1_input to calculate node_1_output.
import numpy as np
input_data = np.array([-1, 2])
weights = {
   'node_0': np.array([3, 3]),
   'node_1': np.array([1, 5]),
   'output': np.array([2, -1])
}
node_0_input = (input_data * weights['node_0']).sum()
node_0_output = np.tanh(node_0_input)
node_1_input = (input_data * weights['node_1']).sum()
node_1_output = np.tanh(node_1_input)
hidden_layer_output = np.array(node_0_output, node_1_output)
output =(hidden_layer_output * weights['output']).sum()
print(output)

def relu(input):
   '''Define your relu activation function here'''
   # Calculate the value for the output of the relu function: output
   output = max(input,0)
      # Return the value just calculated
   return(output)
# Calculate node 0 value: node_0_output
node_0_input = (input_data * weights['node_0']).sum()
node_0_output = relu(node_0_input)

# Calculate node 1 value: node_1_output
node_1_input = (input_data * weights['node_1']).sum()
node_1_output = relu(node_1_input)

# Put node values into array: hidden_layer_outputs
hidden_layer_outputs = np.array([node_0_output, node_1_output])

# Calculate model output (do not apply relu)
odel_output = (hidden_layer_outputs * weights['output']).sum()
print(model_output)# Print model output
Output
0.9950547536867305
-3
Applying the network to many Observations/rows of data
在本節中,我們將學習如何定義名爲predict_with_network()的函數。此函數將生成多個數據觀測的預測,從上述網絡獲取作爲輸入數據。正在使用上述網絡中給定的權重。relu()函數定義也正在使用。
讓我們定義一個名爲predict_with_network()的函數,它接受兩個參數-input_data_row和weights-並從網絡返回一個預測作爲輸出。
我們計算每個節點的輸入和輸出值,將它們存儲爲:node_0_輸入、node_0_輸出、node_1_輸入和node_1_輸出。
爲了計算節點的輸入值,我們將相關數組相乘並計算它們的和。
要計算節點的輸出值,我們將relu()函數應用於節點的輸入值。我們使用「for循環」來疊代輸入的數據;
我們還使用predict_with_network()爲input_data-input_data行的每一行生成預測。我們還將每個預測附加到結果中。
# Define predict_with_network()
def predict_with_network(input_data_row, weights):
   # Calculate node 0 value
   node_0_input = (input_data_row * weights['node_0']).sum()
   node_0_output = relu(node_0_input)

   # Calculate node 1 value
   node_1_input = (input_data_row * weights['node_1']).sum()
   node_1_output = relu(node_1_input)

   # Put node values into array: hidden_layer_outputs
   hidden_layer_outputs = np.array([node_0_output, node_1_output])

   # Calculate model output
   input_to_final_layer = (hidden_layer_outputs*weights['output']).sum()
   model_output = relu(input_to_final_layer)
# Return model output
   return(model_output)

# Create empty list to store prediction results
results = []
for input_data_row in input_data:
   # Append prediction to results
   results.append(predict_with_network(input_data_row, weights))
print(results)# Print results
Output
[0, 12]
這裡我們使用relu函數,其中relu(26)=26,relu(-13)=0,依此類推。
Deep multi-layer neural networks
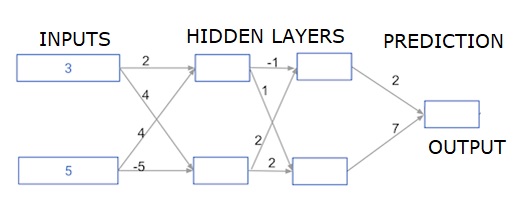
在這裡,我們編寫代碼來做兩個隱藏層的神經網絡的正向傳播。每個隱藏層有兩個節點。輸入數據已預加載爲輸入數據。第一個隱藏層中的節點稱爲node_0_0和node_0_1。
它們的權重分別預加載爲權重['node_0_0']和權重['node_0_1']。
第二個隱藏層中的節點稱爲node_1_0和node_1_1。它們的權重分別預加載爲權重['node_1_0']和權重['node_1_1']。
然後,我們使用預先加載爲權重['output']的權重從隱藏節點創建模型輸出。

我們使用節點的權重和給定的輸入數據計算節點的輸入。然後應用relu()函數獲取node_0_0_輸出。
我們對node_0_1_輸入執行上述操作,以獲取node_0_1_輸出。
我們使用節點的權重和第一個隱藏層的輸出計算節點的輸入。然後我們應用relu()函數來獲取node_1_0_輸出。
我們對node_1_1_1_輸入執行上述操作,以獲得node_1_1_1_輸出。
我們使用權重[「output」]和來自第二隱藏層hidden_1_outputs數組的輸出計算模型_輸出。我們不對該輸出應用relu()函數。